
Cisco Meraki - Guest Wi-Fi Ambassadors
Last week a customer had a unique requirement to only serve Wi-Fi to their clients (Guests) on a timed basis. They wanted the ability to grant their staff access to the Wi-Fi system with controls to create user accounts and enforce time limits for using Wi-Fi.
Problem
Does Cisco Meraki have the capability to create a Wi-Fi network and allow non-adminstrators access to creating users and granting access to Wi-Fi? The answer is a resounding yes. Cicso Meraki (Cloud) allows administrators to create accounts called Guest Ambassadors, which can create user accounts at a Site level and allow user accounts access to the Wi-Fi at a defined time limit.
Solution
1. First, start by logging into your Cisco Meraki (Cloud) dashboard at https://account.meraki.com/login/dashboard_login
2. Next, select your Organization that you want to add Guest Wi-Fi Ambassador capability to.
3. On the left-hand menu, select the Network you want to make the change in.
Add Guest Ambassadors
4. Go to Organization > Administrators
5. In the top right you will see a button called Add Admin. Use this and add the Name, Email. Choose Organization access as none. Choose Target as the Site you want to apply it to and put the Access level to Guest Ambassador.
6. Select Create Admin.
You should now see the following example:

Create a Guest Enabled Wi-Fi Network
7. On the left-hand menu, selectWireless > SSIDs
8. Select the SSID you want to edit by selecting edit settings. If you want to create a new network, select Show all my SSIDs and enable a new SSID.
9. Under Security select the option as Open (no encryption). (You can also choose Password if you want your clients to first authenticate with a password before hitting the Guest splash screen.
10. Under Splash page select Sign-on with > Meraki Cloud Authentication. Then complete the rest of the SSID setup to your configuration requirements.
Login as Guest Ambassador
11. You can now have your Guest Ambassador(s) login with their accounts and issue Guest accounts. Have them check their e-mail for a setup link and ensure they have the Meraki dashboard page saved.
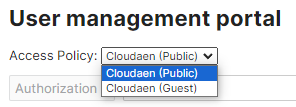
12. As a Guest Ambassador, they can now create users for the Networks they have been assigned. Have them choose an Access Policy in the top left (if you have multiple SSIDs with Guest capabilities).
13. Have them go to Add new user and fill in the details for the user. The can then choose Authorized and issue an expiration of the Wi-Fi session for the Guest. (See below for example)

14. You will no longer need to add this user in the future as you will only need to authorize them when you want to grant the Guest Wi-Fi the next time the require it. You can do this by click on their name on the list and re-using the Authorized dropdown.

Note: Another neat piece of information is Guest e-mail addresses do not need verification. This means if the Guest is not willing to give their e-mail you can place a fake e-mail into the system for them to allow them access to your Guest Wi-Fi Network(s).
Summary
When customers come up with unique requirements it is important for IT professionals to have the necessary tools and information to fulfill the requests. With Cisco Meraki (Cloud), you can create Guest Wi-Fi Networks and allow non-administrators to create user accounts as Guest Ambassadors and issue timed access to Wi-Fi. Customers should no longer worry about changing their Guest Wi-Fi passwords as these timed authorizations require Guests to ask for future access to Wi-Fi networks.
Related Documentation
Cisco Meraki: Managing Dashboard Administrators and Permissions